The xu1541
NOTE
While the XU1541 as described here works, it is very low-cost. Unfortunately, this also means you have many restrictions. For example, fast parallel transfers, as well as fast transfers with 1570/1571 devices do not work.
The XUM1541 is the successor of the XU1541. The XUM1541 is a framework to build several devices. The one best know is probably the ZoomFloppy which can be purchased ready-built.
Before building an XU1541, consider if an XUM1541/ZoomFloppy, although more expensive, is not a better choice.
NOTE
The xu1541 project was started by Till Harbaum. In December 2007, he announced that he lost interest in the project and cancelled it completely. This web page here is mainly a copy from his web page, so it can be used as a base to build the xu1541 cable. The xu1541 cable will be supported by the OpenCBM team. If you have any questions, suggestions, etc., please feel free to send them to the opencbm-user mailing list (Subscription), or file a bug/feature request or support request on the Sourceforge Tracker.
Please, do NOT contact Till, as he is not interested in this project anymore!
What is the xu1541?
The xu1541 was the modern way to connect CBM IEC bus devices to todays USB equipped PCs (The more modern alternative is the XUM1541). It was meant to replace the printer port solutions based on the so-called original x1541 cable. The xu1541 interface allows you e.g. to attach a VIC1541 disk drive to your desktop PC as depicted below. This allows for easy transfer of disk images from and to the old units and helps you preserve your ancient data.
The xu1541 is a proprietary interface. It does not transform the VIC1541 into a standard usb mass storage compliant device. Instead it provides a means to send low level IEC commands forth and back via the USB. PC software developed to support this interface may then directly access the disk drive and the contents of a disk inserted. It should also be possible to access other IEC devices like printers. Currently e.g. the git version of the OpenCBM software supports this interface.
Intended audience
This project works with a variety of CBM disc drives (1541, 1541-II, 1570, 1571, 1581, SX-64's internal floppy). There have been also some tests on different brands and types of PC, running on Windows, Linux, and Mac OS X.
However, the xu1541 is currently only recommended for people who are willing to cope with glitches and will perhaps even do some testing and bug hunting. For example, you should be able to flash a new firmware on your own.
Design goals
The xu1541 was designed to be made of easily obtained parts, easy to assemble and cheap. In order to avoid having to write all the necessary PC software, the xu1541 was designed to easily integrate into existing software developed for the original x1541 parallel cable family.
The xu1541 is not meant to be the all-in-one cable. It is meant to connect the PC to CBM IEC serial periphery like the VIC1541 floppy disk drive. It cannot act as CBM IEC client and can thus not be used to emulate a floppy disk drive with the PC. Furthermore it does not support the so-called nibblers, meaning that the cable cannot be used to transfer copy protected disk images from and to the VIC1541. These limitations are due to the simplicity of the design. A CBM IEC floppy emulation requires an interface to respond faster to incoming requests from the C64 than the xu1541 currently can do with the software USB implementation. Nibbler support requires a 8 kilobytes (one VIC1541 disk track) buffer which exceeds the 1 kilobytes RAM present in the Atmega8 used on the xu1541. These options are left for future and more complex and more expensive USB to IEC solutions, like the xum1541.
The xu1541 is fully compatible with all tools delivered with the OpenCBM package. More precisely, OpenCBM includes full support for all the features of the xu1541. Therefore, it fully supports e.g. the tools cbmctrl, cbmcopy, cbmformat and d64copy. It allows to control the disk drive (e.g. read the drive status or the directory), it allows to format a disk, to copy single files from and to the disk, and to copy entire not-copy-protected disk images (d64 images).
Implementation
The xu1541 is based on some other projects. These are:
- lcd2usb, a project of Till Harbaum on which he based the first xu1541 prototype,
- OpenCBM, formerly cbm4linux, a framework for accessing the CBM IEC bus under linux and windows,
- cbm4win, the windows incarnation of OpenCBM,
- V-USB, a great software implementation for the AVR (more precisely, the xu1541 still uses AVRUSB, the older version of it),
- usbtiny, another software USB implementation for the AVR,
- AVRUSBBoot, a USB boot loader for the AVR,
- libusb, a user space USB interface library, and
- libusb-win32, the windows port of the libusb.
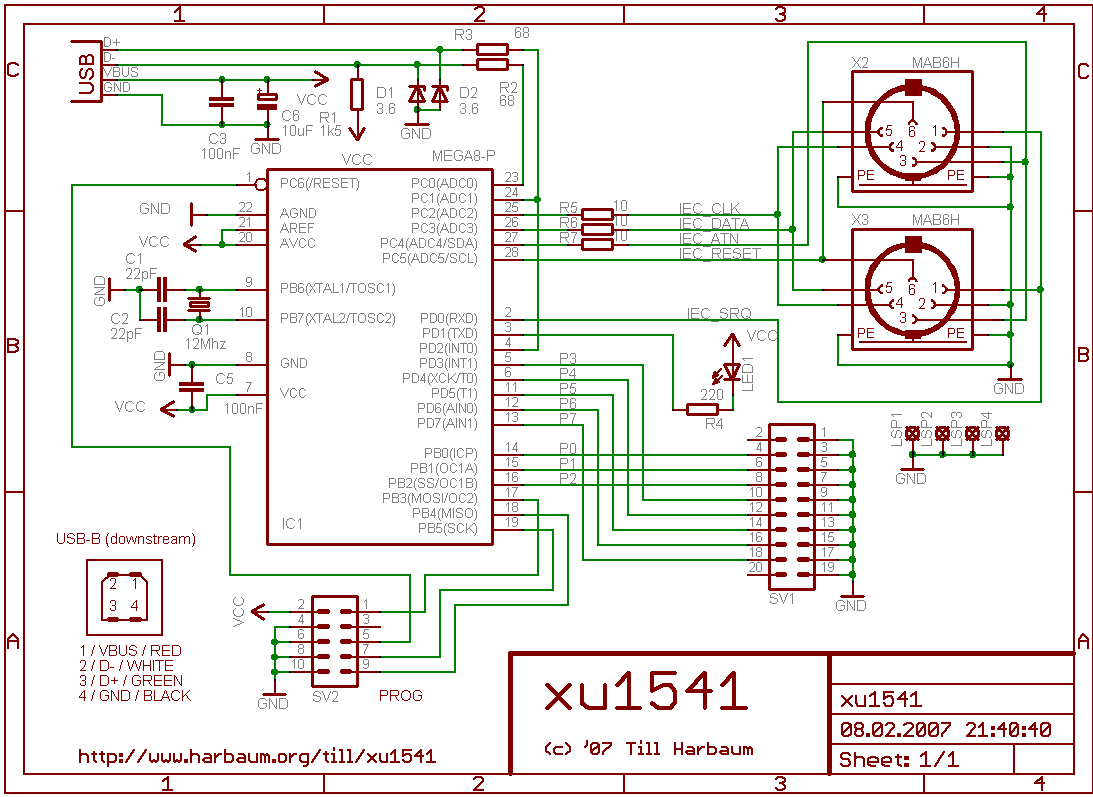
The firmware of the xu1541 device is based on the software USB solutions for the AVR CPU. It also includes parts of the source code from OpenCBM, namely parts of the linux kernel driver for the x1541 cable family. This includes generic CBM IEC routines following the communication style of the stock c64 as well as the special "speeder" modes supported by OpenCBM.
On the PC side the OpenCBM framework has been updated to be able to redirect the IEC communication via USB. Thus, it uses the libusb now to access the USB based xu1541. Other software intended to make use of the xu1541 cable thus needs libusb support as well. This e.g. means that very old DOS programs like Star Commander cannot easily be updated to support the xu1541 since there's no USB support for DOS. (However, with the help of OpenCBM, the Star Commander or other tools should be able to access xu1541 drives from inside of Windows!) On the other hand, the platforms that lack a printer port driver for the old x1541 cable family but have libusb support can be equipped with the xu1541. This is e.g. true for MacOS X, Solaris and some freeBSD platforms which weren't able to support the x1541 printer port cable family and thus weren't supported by OpenCBM so far.
CBM IEC support
The current xu1541 can act as a CBM IEC master only. This means that it can play the role of a C64 and control a floppy disk or printer. It can not be connected to a C64 in order to act as a virtual disk drive. This is due to the fact that the software USB solution used in this project prevents the AVR from being able to react fast enough on incoming requests (the USB stack requires that no other hardware interrupts are being used). This very interesting application is left for the successor of the xu1541.
In order to support the CBM IEC protocol at a reasonable speed, some aspects of the protocol are handled inside the xu1541 itself. The downside of such an approach is that "speeder" support has also to be hardcoded into the firmware of the xu1541. The speeder support routines present in the current xu1541 version are the "serial1", "serial2" and "pp" (d64copy and cbmcopy versions) routines from the OpenCBM package. The latest version of the xu1541 firmware package includes a BIOS with boot loader to ease the implementation of new speeder routines and to help the xu1541 to keep pace with the ongoing development of OpenCBM.
The xu1541 also allows to control each IEC control line seperately over the USB. This approach is only recommended for low performance things like device initialization etc. Using this approach causes a seperate USB transfer to take place for every single change of one of the IEC lines resulting in several USB transfers for every single bit to be tranferred. This is possible but nowhere near fast. This approach is therefore e.g. only being used during device initialization right before the accelerated "speeder" modes are being used. The data transfer phase itself then uses the specialized pre-defined byte transfer routines mentioned before. This entire approach has the advantage of moving only the timing critical byte transfer routines into the xu1541 itself and thus reducing the probability of having to change these functions in the firmware once e.g. bugs in the current speeder protocol implementations are found.
Host support
Since the xu1541 implements a proprietary USB-to-CBM-IEC protocol only host software aware of the xu1541 is able to make use of the interface. The xu1541 cable is supported by the following host software:
The hardware
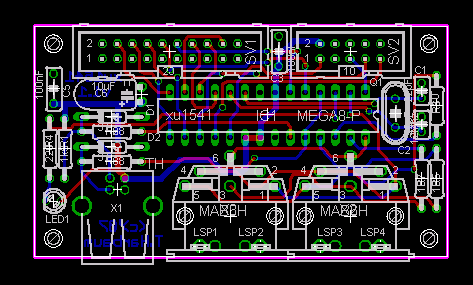
The hardware is designed to be as simple as possible. It therefore consists of through-hole components only. Additionally all components are cheap (less than EUR 5 total) and easily available e.g. from Reichelt. The entire device is powered from USB and doesn't need an additional power supply.
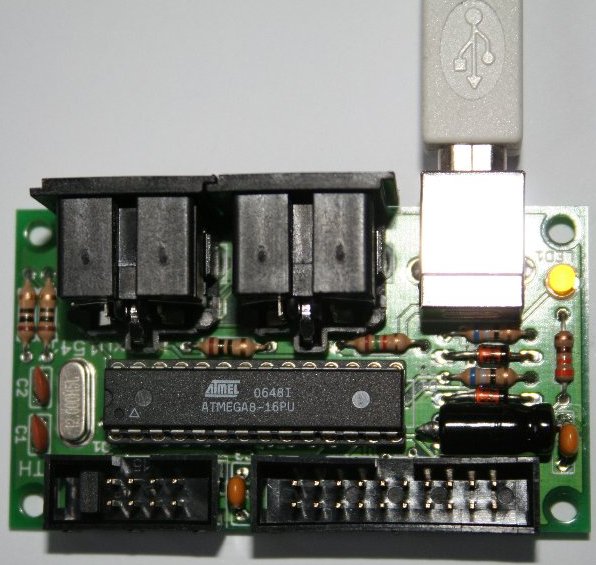
The xu1541 includes two IEC connectors (X2 and X3). Both are connected in parallel and can both be used at the same time. The parallel port connector SV1 can be used to connect one of those parallel speeder cables that once were a popular way to speed up the slow 1541 in these ancient days.
Version 1.1 of the PCB allows for two popular types of the DIN 6 sockets. The version sold bei Reichelt (see part list below) fits as well as the Hirschmann connector.
The parts list
I have prepared a shopping cart at Reichelt. It contains the following parts:
- Part
- Quantity
- Name
- Reichelt Part No.
- Q1
- 1
- 12Mhz crystal, HC49U package
- 12-HC49U-S
- R1
- 1
- 1.5k ohm resistor
- 1/4W 1,5k
- R2, R3
- 2
- 68 ohm resistor
- 1/4W 68
- R4
- 1
- 220 ohm resistor
- 1/4W 220
- R5, R6, R7
- 3
- 10 ohm resistor
- 1/4W 10
- C1, C2
- 2
- 22pF ceramic capacitor, 2.54mm
- KERKO 22P
- C3, C5
- 2
- 100nF capacitor, 5.08mm
- Z5U-5 100N
- C6
- 1
- 10μF electrolytic capacitor
- RAD 10/35
- SV1
- 1
- 20 pin parallel connector
- WSL 20G
- SV2
- 1
- 10 pin ISP connector
- WSL 10G
- X1
- 1
- USB-B print connector
- USB BW
- X2, X3
- 2
- 6 pin DIN sockets
- MABP 6
- LED1
- 1
- LED 3mm yellow
- LED 3MM GE
- IC1
- 1
- Atmega8-16 DIP
- ATMEGA 8-16 DIP
- 1
- socket for IC1
- GS 28P-S
- D1, D2
- 2
- 3.6V zener diode
- ZD 3,6
Firmware upload
The AVR CPU of the xu1541 requires a firmware to be installed in order to make it work. In fact, it needs a BIOS (based on the boot loader from Thomas Fischl) and the "real" firmware. You have to install the BIOS (bootloader) first, then the firmware.
Installing the BIOS (for the first time)
If there is already a BIOS installed on your xu1541, you can update the xu1541 over the USB cable. If there is no BIOS yet installed, a special download cable/interface connected to connector SV2 is required to download either the BIOS. Various download solutions exist from the simple STK200 compatible interface to devices like the stk500, the AVR-Doper, or the AVR Dragon.
Once such a cable is connected, the BIOS is uploaded from a PC using programmer software like uisp (linux), avrdude (windows, macos and linux) or Ponyprog (linux and windows). The Makefile in the xu1541 git is prepared to support the stk200 compatible adapter using avrdude under linux. To use it just enter "make program-avrusb". This should also work under Windows.
The command required to manually flash the BIOS (bootldr-xxxx.hex in this example) using the stk200 compatible adaptor is:
avrdude -c stk200 -p atmega8 -U lfuse:w:0x9f:m -U hfuse:w:0xc8:m -U flash:w:bootldr-avrusb.hex
or
avrdude -c stk200 -p atmega8 -U lfuse:w:0x9f:m -U hfuse:w:0xc8:m -U flash:w:bootldr-usbtiny.hex
Two versions of the BIOS exist. Both provide the same functionality but are based on different AVR usb implementations. It shouldn't make a difference which version you use. But if you encounter problems it may be worth giving the other version a try. Please report such incompatibilities.
Flashing the firmware
Once the BIOS is installed, it can be used to easily install the firmware itself via USB. In order to install the firmware on a BIOS equipped xu1541 the following steps are required:
- Plug in the xu1541, if it is not already. If there is no firmware on the xu1541, the LED will go on and stay on. If there is already a firmware on the xu1541, the LED will go on for a fraction of a second, and go off afterwards.
- Use the upload tool with latest firmware:
make update-firmware - Use the device as usual
Updating the BIOS
If you have already put a BIOS on the xu1541, you have two options to update to a newer BIOS version: Either, you can flash it with an external tool, or you can use the BIOS itself to update the BIOS. To do this, perform the following steps:
- Plug in the xu1541, if it is not already. If there is no firmware on the xu1541, the LED will go on and stay on. If there is already a firmware on the xu1541, the LED will go on for a fraction of a second, and go off afterwards.
- Use the upload tool with latest firmware:
make update-bios-avrusbormake update-bios-usbtiny, depending upon which BIOS you want to flash. - You must reflash the firmware, as described above
- Use the device as usual
There is also the possibility to flash BIOS and firmware in one step. For this, replace the command make update-bios-xxxx by make update-all-avrusb or make update-all-usbtiny.
What to do if you flashed a wrong firmware, or the flash failed?
There is the chance that something went wrong when flashing the firmware, and the xu1541 does not react anymore. In this case, you cannot simply flash a new firmware, as the firmware is needed to start the BIOS boot loader. Anyway, there is a way to force the BIOS to go into boot loader mode, even when the firmware flash failed:
- Unplug the xu1541
- Place a jumper switch between pin 9 and 10 of the 10 pin header (SV2)
- Plug the device in, the LED should go on and stay on (the boot loader is active)
- Use the upload tool to re-flash the firmware:
make update-firmware - Unplug the device
- Remove the jumper switch
- Plug the device into the USB, the LED should flash a fraction of a second (the firmware is active)
You can also use the jumper switch between pin 9 and 10 of the 10 pin header (SV2) in order to flash a new BIOS. In this case, replace the command make update-firmware with the command make update-bios-avrusb or make update-bios-usbtiny.
Downloads
The latest version can always be found in the OpenCBM SCM.
Links
- OpenCBM, formerly cbm4linux and cbm4win, a framework for accessing the CBM IEC bus under linux and windows
- AVR-USB, software USB for the AVR platform
- V-USB, software USB for the AVR platform, (more precisely, the xu1541 still uses AVRUSB, the older version of it)
- USBtiny, another software usb implementation for the AVR
- AVRUSBBoot, a USB boot loader for the AVR
- USB user space library libusb
- Win32 port of libusb